First time installation – Orion 32LBT906D Instrukcja Obsługi
Strona 51
English - 50 -
Set Timer / Delete Timer
After you have selected a programme in EPG menu,
press the OK button and and Options screen will
be displayed. Select “Set Timer on Event” option
and press OK button. You can set a timer for future
programmes.
To cancel an already set reminder, highlight that
programme and press the OK button. Then select
“Delete Timer” option. The timer will be cancelled.
Note: It is not possible to record or set timer for two or
more individual events at the same time interval.
First Time Installation
IMPORTANT: Ensure that the aerial or cable is
connected and a Common Interface module is not
inserted before switching on the TV for the fi rst
time installation.
• When the TV is operated for the fi rst time, installation
wizard will guide you through the process. First,
language selection screen will be displayed:
• Use “ ” or “ ” buttons to select your language
and press OK button to set selected language and
continue.
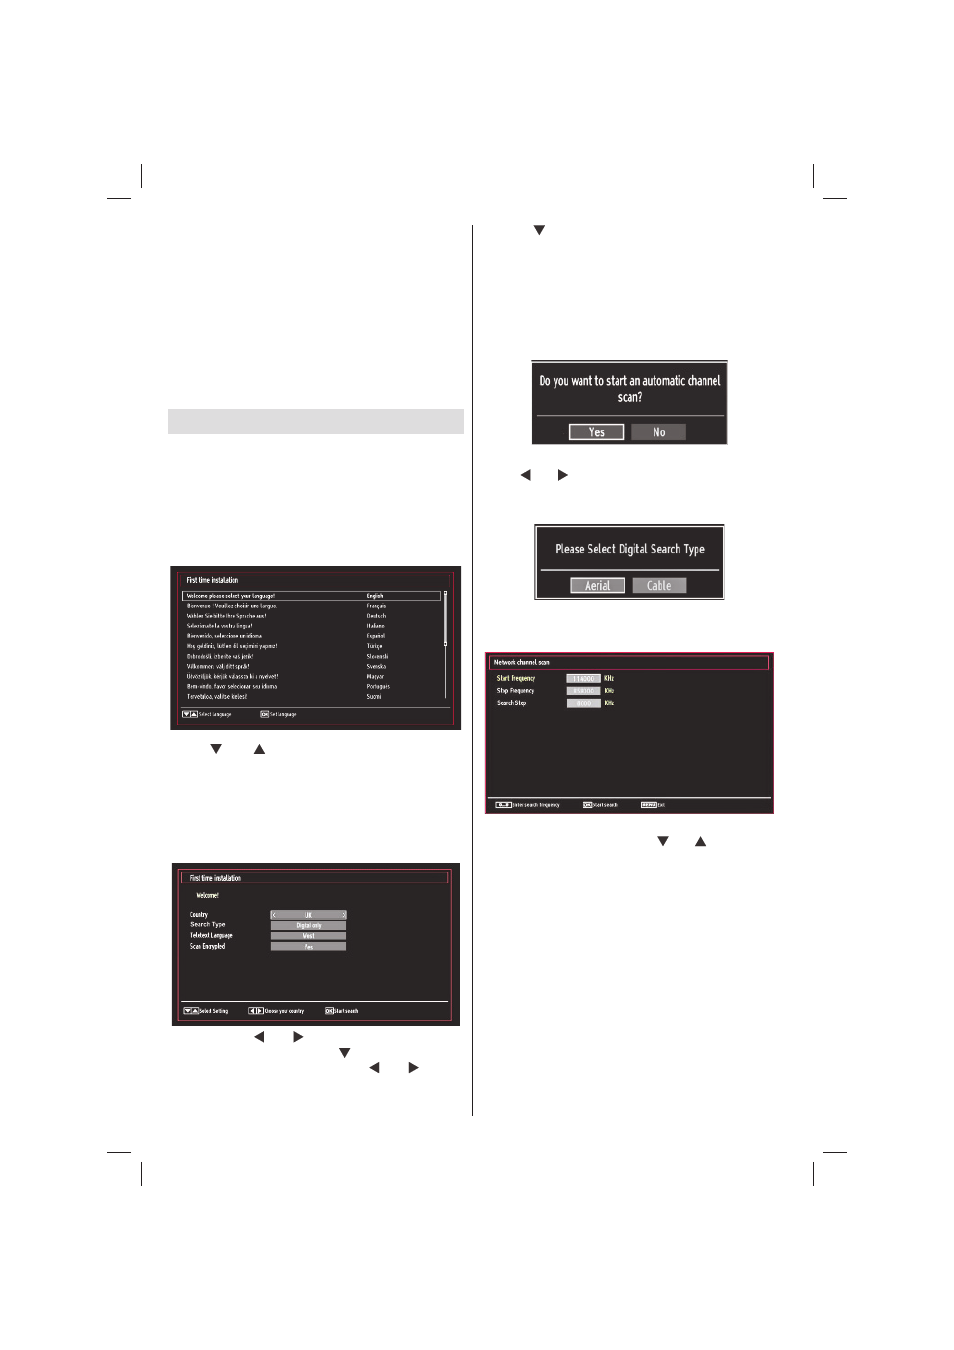
• After selecting the language, “Welcome!” screen will
be displayed, requiring you to set Country, Search
Type, Teletext Language and Scan Encrypted
options.
• By pressing “ ” or “ ” button, select the country
you want to set and press “ ” button to highlight
Teletext Language option. Use “ ” or “ ” button
to select desired Teletext Language.
• Press “ ” button after setting Teletext Language
option. Scan Encrypted will be then highlighted.
You can set Scan Encrypted as Yes if you want to
scan coded stations.Afterwards select the desired
Teletext Language.
• Press OK button on the remote control to continue
and the following message will be displayed on the
screen:
To select the “Yes” or “No” option, highlight the item by
using “ ” or “ ” buttons and press OK button.
Afterwards, the following OSD will be displayed on
the screen:
If you select CABLE option, the following screen will
be displayed:
You can select frequency ranges from this screen. For
highlighting lines you see, use “ ” or “ ” button. You
can enter the frequency range manually by using the
numeric buttons on the remote control. Set Start and
Stop Frequency as desired by using numeric buttons
on the remote control. After this operation, you can set
Search Step as 8000 KHz or 1000 KHz. If you select
1000 KHz, the Tv will perform search process in a
detailed way. Searching duration will thus increase
accordingly. Depending on your Country selection in
the fi rst time installation, 250KHz search step option
might be available on Network Channel Scan screen.
Note that if you perform the search with 250KHz
option, search process could take a longer time.
Additionally, for some countries, Network ID option
will be available. Network ID feature gets the Network
Information Table. This table provides information on
the selected network. It may change according to the
operator and the region where that operator actively
02_MB62_[GB]_woypbpr_IDTV_TC_NICKEL17_5110UK_32906W_10081597_50231723.indd 50
02_MB62_[GB]_woypbpr_IDTV_TC_NICKEL17_5110UK_32906W_10081597_50231723.indd 50
28.09.2012 13:21:40
28.09.2012 13:21:40